


While configuring email-to-case for a client, an issue became clear throughout setup, sales reps needed to forward orders and customer requests to the CS team and their service email. The issue being the contact on the case was being created as null or if the sales rep had a contact in Salesforce, it would make them the contact. In reality, they needed the original customer who emailed the rep to be added as a contact. In this guide I will walk you how to do this with a flow.
I will not be providing full details, such as Email-to-Case setup, only the primary aspects of the solution. Before diving into the setup, ensure you have the following.
Salesforce Edition: Most editions support Flows but verify your edition’s compatibility.
Permissions: Administrative privileges to create and modify Flows, Objects, and Fields.
Email-to-Case Setup: Enabled and configured with a dedicated support email address.
Understanding Email Forwarding Format: Familiarity with how sales reps forward emails (inline or as attachments) to effectively parse the original sender.
- The flow below only works for inline forwarding, if there is a need for attached forwarding, please leave a comment.
Now that you have ensured the items above, let’s create the Flow that will:
- Trigger when a Case is created via Email-to-Case.
- Parse the Case description to extract the original sender’s email and name.
- Lookup the Contact based on the extracted email.
- Assign the found or created Contact to the Case.
Navigate to Flow Builder
- Go to Setup
- In the Quick Find box, type Flows
- Select Flows
- Click New Flow
Choose Flow Type
- In the New Flow dialog, select Record-Triggered Flow
- Click Create
Configure Start Element
- Object: Select Case
- Trigger the Flow When:
- A record is created.
- Condition Requirements:
- To ensure the Flow runs only for Cases created via Email-to-Case, add a condition:
- Field: Origin
- Operator: Equals
- Value: Email
- Optimize the Flow for: Actions and Related Records.
- Click Done.
- To ensure the Flow runs only for Cases created via Email-to-Case, add a condition:
Add a Get Records Element to Extract Original Sender’s Email
As we will need to parse the Case Description to find the original sender’s email, we’ll handle this within the Flow.
Note: Salesforce Flow does not have native text parsing capabilities as robust as Apex, but this is possible with the following formulas and elements in a flow.
Add Formula Resources to Extract Email and Name
Let’s create two separate formulas:
- Extracted_Email: Extracts the sender’s email.
- Extracted_Name: Extracts the sender’s full name.
Extracted_Email Formula
- In the Flow Builder, click New Resource
- Resource Type: Formula
- API Name: Extracted_Email
- Data Type: Text
- Formula:
IF(
    AND(
        CONTAINS($Record.Description, "From:"),
        CONTAINS($Record.Description, "<"),
        CONTAINS($Record.Description, ">")
    ),
    MID(
        $Record.Description,
        FIND("<", $Record.Description, FIND("From:", $Record.Description)) + 1,
        FIND(">", $Record.Description, FIND("<", $Record.Description, FIND("From:", $Record.Description)))
        - FIND("<", $Record.Description, FIND("From:", $Record.Description))
        - 1
    ),
    IF(
        CONTAINS($Record.Description, "From:"),
        TRIM(
            MID(
                $Record.Description,
                FIND("From:", $Record.Description) + 5,
                FIND("Sent:", $Record.Description, FIND("From:", $Record.Description))
                - (FIND("From:", $Record.Description) + 5)
            )
        ),
        ""
    )
)
- Click Done
Extracted_Name Formula
- Click New Resource
- Resource Type: Formula
- API Name: Extracted_Name
- Data Type: Text
- Formula:
IF(
    AND(
        CONTAINS($Record.Description, "From:"),
        CONTAINS($Record.Description, "<")
    ),
    TRIM(
        MID(
            $Record.Description,
            FIND("From:", $Record.Description) + 5,
            FIND("<", $Record.Description, FIND("From:", $Record.Description))
            - (FIND("From:", $Record.Description) + 5)
        )
    ),
    IF(
        CONTAINS($Record.Description, "From:"),
        TRIM(
            MID(
                $Record.Description,
                FIND("From:", $Record.Description) + 5,
                FIND("Sent:", $Record.Description, FIND("From:", $Record.Description))
                - (FIND("From:", $Record.Description) + 5)
            )
        ),
        ""
    )
)
- Click Done
Split Extracted_Name Formula into First and Last Names
Extracted_First_Name Formula
- Click New Resource
- Resource Type: Formula.
- API Name: Extracted_First_Name
- Data Type: Text
- Formula:
IF(
    CONTAINS(, " "),
    LEFT(
        ,
        FIND(" ", ) - 1
    ),

)
Click Done
Extracted_Last_Name Formula
- Click New Resource.
- Resource Type: Formula.
- API Name: Extracted_Last_Name
- Data Type: Text
- Formula:
IF(
    CONTAINS(, " "),
    RIGHT(
        ,
        LEN() - FIND(" ", )
    ),
    ""
)
Click Done
Setup the Flow to ensure accurate extraction and assignment of Contact information.
Decision Element: Is Email Extracted?
- Create a Decision element after Start
- Label: Is Email Extracted?
- Description: Checks if the email was successfully extracted.
- Outcomes:
- Outcome 1:
- Label: Email Found
- Condition: Extracted_Email is not null.
- Default Outcome:
- Label: Email Not Found
Handle the Email Found Outcome
Get Records: Find Contact by Email
- Create a Get Records element under the Email Found outcome.
- Label: Find Contact by Email
- Object: Contact
- Filter Conditions:
- Email equals {!Extracted_Email}
- How Many Records to Store: Only the first record.
- How to Store Record Data: Automatically store all fields.
Decision Element: Does Contact Exist?
- Create a Decision element.
- Label: Does Contact Exist?
- Outcomes:
- Outcome 1:
- Label: Contact Found
- Condition: Find_Contact_by_Email is not null.
- Default Outcome:
- Label: Contact Not Found
Handle “Contact Found” Outcome
- Create an Update Records element under Contact Found
- Label: Assign Existing Contact to Case
- Object: Case
- Record to Update: The Case that triggered the Flow ($Record.Id)
- Set Field Values:
- ContactId = {!Find_Contact_by_Email.Id}
Handle “Contact Not Found” Outcome
Create New Contact
- Create a Create Records element under Contact Not Found
- Label: Create New Contact
- Object: Contact
- Set Field Values:
- First Name: {!Extracted_First_Name}
- Last Name: {!Extracted_Last_Name}
- Email: {!Extracted_Email}
- Other Fields: Populate as needed (i.e., Lead Source)
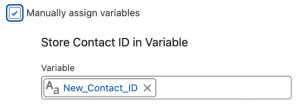
- Store the Created Contact’s ID:
- How to Store: Select Use separate resources, and literal values.
- Create a Variable:
- Click “New Resource” > Variable
- API Name: New_Contact_ID
- Data Type: Text
- Available for input: False
- Available for output: False
- Map the ID:
- In the Create New Contact action, set Store Output Automatically by selecting New_Contact_ID
Assign New Contact to Case
- Create an Update Records element under Create New Contact
- Label: Assign New Contact to Case
- Object: Case
- Record to Update: The Case that triggered the Flow ($Record.Id)
- Set Field Values:
- ContactId = {!New_Contact_ID}
Handle the “Email Not Found” Outcome
Choose how to handle cases where the email extraction fails.
Option 1: Do nothing
- Simply end the Flow or leave the Contact field blank.
Option 2: Notify an Admin or Log the Issue
- Create an Action element under Email Not Found
- Action Type: Email Alert or Create a Task.
- Label: Notify Admin – Email Extraction Failed
- Configure** as needed (e.g., specify admin email, include case details).
Ensure that all elements are properly connected:

Save and Activate the Flow
Final Thoughts
With this guide, you’ve created a Salesforce Flow that automatically assigns the original From emailer as the Contact on Cases Forwarded by Sales Reps and created via Email-to-Case. This will help that bottle neck if your sales team receives customer service related inquiries and need to forward them to your CS team.
Don’t hesitate to drop a comment if you need any help – Happy automating!


